

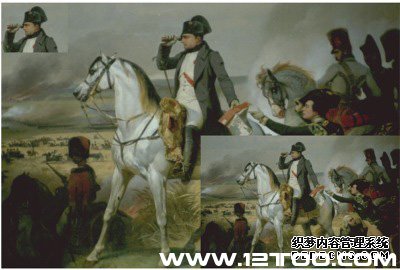
drawImage() ЗНЗЈЁЃdrawImage() ЗНЗЈга 3 ИібЁЯюЁЃФњПЩвдЪЙгУ 3 ИіЁЂ5 ИіЛђ 9 ИіВЮЪ§ЁЃdrawImage(image, dx, dy)ЃЌПЩНЋЭМЯёЛцжЦдкЛВМЕФФПБъзјБъ (dx, dy) ЩЯЁЃИУзјБъЙЙГЩЭМЯёЕФзѓЩЯНЧЁЃdrawImage(image, dx, dy, dw, dh)ЃЌПЩЮЊФПБъзјБъЬсЙЉПэЖШКЭИпЖШЁЃНЋЫѕЗХЭМЯёвдЪЪКЯФПБъПэЖШКЭИпЖШЁЃdrawImage(image, sx, sy, sw, sh, dx, dy, dw, dh)ЃЌПЩДгвЛИіЭМЯёжаМєЧавЛИіОиаЮЧјгђЃЌИУЧјгђЕФдзјБъЮЊ (sx,sy)ЃЌПэЖШКЭИпЖШЮЊ (sw,sh)ЃЌШЛКѓЫѕЗХИУЧјгђЪЙжЎЪЪКЯгкФПБъПэЖШКЭИпЖШ (dw,dh)ЃЌВЂНЋЦфЗХжУЕНЛВМЕФ (dx,dy) ЮЛжУЩЯЁЃ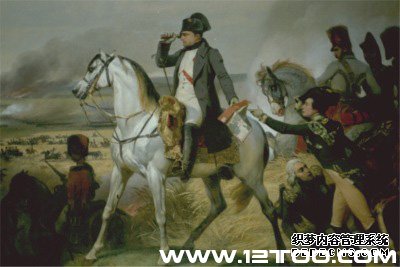
| 1 2 3 4 5 6 7 8 9 10 11 12 13 14 15 16 17 18 19 20 21 22 23 24 25 26 27 28 29 30 31 32 33 34 35 36 37 38 39 40 41 42 43 44 45 46 47 48 49 50 51 52 53 |
<!doctype>
<html>
<head>
<title>Crop Example</title>
<script type="text/javascript">
window.onload = function() {
var canvas=document.getElementById("cropNapolean");
var context=canvas.getContext("2d");
var imageObj = new Image();
imageObj.onload = function() {
// draw image to cover the entire canvas
context.drawImage(imageObj,0,0, 600, 400);
// draw small image in bottom right corner
var sourceX = 0;
var sourceY = 0;
var sourceWidth = 1200;
var sourceHeight = 801;
var destX = 300;
var destY = 200;
var destWidth = sourceWidth - 900;
var destHeight = sourceHeight - 600;
context.drawImage(imageObj, sourceX, sourceY, sourceWidth,
sourceHeight, destX, destY, destWidth, destHeight);
//draw Napolean's head only
var sourceNapoleanX = 460;
var sourceNapoleanY = 25;
var sourceNapoleanWidth = 250;
var sourceNapoleanHeight = 175;
var destNapoleanX = 0;
var destNapoleanY = 0;
var destNapoleanWidth = sourceNapoleanWidth - 150 ;
var destNapoleanHeight = sourceNapoleanHeight - 100;
context.drawImage(imageObj, sourceNapoleanX, sourceNapoleanY,
sourceNapoleanWidth, sourceNapoleanHeight,
destNapoleanX, destNapoleanY,
destNapoleanWidth, destNapoleanHeight);
}
imageObj.src = "Napoleon.png";
}
</script>
</head>
<body>
<div>
<p><canvas id="cropNapolean" width="600" height="400"></canvas></p>
</div>
</body>
</html>
|
setInterval Лђ setTimeout КЏЪ§ЃЌСНИіКЏЪ§ОљПЩдкЙЬЖЈЕФЪБМфЖЮФкЕїгУКЏЪ§ЁЃsetInterval КЏЪ§жиИДжДааЫљЬсЙЉЕФДњТыЁЃsetTimeout КЏЪ§НідкЫљЬсЙЉЕФЪБМфЖЮЕНДяЪБЕїгУвЛДЮЁЃ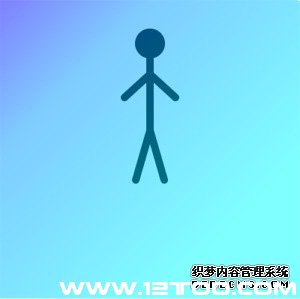
positionX КЭ positionY жЕРДДДНЈгЮгОепЕФЖЏЛЃЌетНЋИФБфЭМЯёЕФзЫЪЦЁЃЪЙгУ arc() ЗНЗЈРДДДНЈгЮгОепЕФЭЗВПЁЃЭЈЙ§ЛцжЦжБЯпДДНЈгЮгОепЕФИьВВКЭЭШЃЌШЛКѓдкИФБфЫќУЧЕФ lineTo() ЮЛжУЁЃдйЭЈЙ§ИФБф moveTo() ЕФЮЛжУРДИФБфЧћИЩЁЃгЩгкетЪЧЖЏЛЃЌЫљвдБиаыдЫааДњТыВХФмПДЕНгЮгОепЕФгЮгОЖЏзїЁЃ| 1 2 3 4 5 6 7 8 9 10 11 12 13 14 15 16 17 18 19 20 21 22 23 24 25 26 27 28 29 30 31 32 33 34 35 36 37 38 39 40 41 42 43 44 45 46 47 48 49 50 51 52 53 54 55 56 57 58 59 60 61 62 63 64 65 66 67 68 69 70 71 72 73 74 75 76 77 78 79 80 81 82 83 84 85 86 87 88 89 90 91 92 93 94 95 96 97 98 99 100 101 102 103 104 105 106 107 108 109 110 111 112 113 114 115 116 117 118 119 120 121 122 |
<!DOCTYPE HTML>
<html>
<head>
<title>Animation & Multiple Canvas Example</title>
<script>
// Water canvas
function drawWater() {
var canvasWater = document.getElementById("myWaterCanvas");
var contextWater = canvasWater.getContext("2d");
contextWater.globalAlpha = .50 ;
// Create a linear gradient fill
var linearGrad = contextWater.createLinearGradient(0,0,400,400);
linearGrad.addColorStop(0, '#0000ff'); // sets the first color
linearGrad.addColorStop(.25, '#0099ff'); // sets the second color
linearGrad.addColorStop(.50, '#00ccff'); // sets the third color
linearGrad.addColorStop(.75, '#00ffff'); // sets the fourth color
contextWater.fillStyle = linearGrad;
contextWater.fillRect(0,0,400,400);
}
// Swimmer canvas
setInterval(drawSwimmer, 30);
var positionX = 0;
var positionY = 0;
function drawSwimmer(){
var canvasSwimmer = document.getElementById("mySwimmerCanvas");
var contextSwimmer = canvasSwimmer.getContext("2d");
contextSwimmer.clearRect(0,0,400,400);
if (positionX < 30)
{
positionX += 1;
positionY += 1;
}
else
{
positionX = 0;
positionY = 0;
}
contextSwimmer.save();
// draw circle for head
var centerX = 200;
var centerY = 50;
var radius = 20;
contextSwimmer.beginPath();
contextSwimmer.arc(centerX, centerY+positionY,
radius, 0, 2 * Math.PI, false);
contextSwimmer.fillStyle = "#000000";
contextSwimmer.fill();
contextSwimmer.lineWidth = 5;
// torso
contextSwimmer.beginPath();
contextSwimmer.moveTo(200,70+positionY);
contextSwimmer.lineTo(200,175);
contextSwimmer.lineWidth = 10;
contextSwimmer.strokeStyle = "#000000";
contextSwimmer.lineCap = "round";
contextSwimmer.stroke();
// image right arm
contextSwimmer.beginPath();
contextSwimmer.moveTo(200, 100);
contextSwimmer.lineTo(175-positionX,140-positionY);
contextSwimmer.lineWidth = 10;
contextSwimmer.strokeStyle = "#000000";
contextSwimmer.lineCap = "round";
contextSwimmer.stroke();
// image left arm
contextSwimmer.beginPath();
contextSwimmer.moveTo(200, 100);
contextSwimmer.lineTo(225+positionX,140-positionY);
contextSwimmer.lineWidth = 10;
contextSwimmer.strokeStyle = "#000000";
contextSwimmer.lineCap = "round";
contextSwimmer.stroke();
// image right leg
contextSwimmer.beginPath();
contextSwimmer.moveTo(200, 175);
contextSwimmer.lineTo(190-positionX,250-positionY);
contextSwimmer.lineWidth = 10;
contextSwimmer.strokeStyle = "#000000";
contextSwimmer.lineCap = "round";
contextSwimmer.stroke();
// image left leg
contextSwimmer.beginPath();
contextSwimmer.moveTo(200, 175);
contextSwimmer.lineTo(210+positionX,250-positionY);
contextSwimmer.lineWidth = 10;
contextSwimmer.strokeStyle = "#000000";
contextSwimmer.lineCap = "round";
contextSwimmer.stroke();
contextSwimmer.restore();
};
</script>
</head>
<body onload="drawWater();">
<canvas id="myWaterCanvas" width="400" height="400" style="z-index: 2;
position:absolute;left:0px;top:0px;">
</canvas>
<canvas id="mySwimmerCanvas" width="400" height="400" style="z-index: 1;
position:absolute;left:0px;top:0px;">
</canvas>
</body>
</html>
|
| УшЪі | Ућзж | ДѓаЁ | ЯТдиЗНЗЈ |
|---|---|---|---|
| Napoleon ЭМЯё | Napoleon.zip | 2045KB | HTTP |
(д№ШЮБрМЃК12ЭМзЪдДПт)
I enjoy what you guys tend to be up too.
Program specjalistce powy&0;szy kurs
ГѕбЇепКмКУЕФВЮПМЃКHTMLБъЧЉЯъОЁНВНт
аТЪжбЇЯАРЯжЊЪЖЃЈЖўЃЉHTMLгУКУЛюЖЏзжФЛБъМЧ
ЭјвГжЦзїГѕбЇепЃКШЯЪЖXHTML DHTML SHTMLЕФ
